Using Cross Links
Contributor: Tim Wilkinson KN6PLV
A cross-link allows you to pass AREDN® traffic across non-AREDN® network links.
Comparison with tunnels
Tunnels and cross-links both connect two nodes together, so they are the same in that respect. However, they do it in very different ways.
Tunnels are a simple to use, all in one feature, which operates over your regular Internet to connect two AREDN® nodes. There is a bit of configuration information to exchange, but it is all fairly easy to set up. Tunnels only work over your WAN connection, you use the IP address given by the server, and there is very little else to configure.
Cross-links, on the other hand, are much more basic and flexible. The configuration lets you choose IP addresses yourself, as well as setting a VLAN and port on which xlink traffic leaves the device. The IP addresses let the system route the data (OLSR works at layer 3 so every interface needs an IP address), but unlike the tunnel you can set these addresses any way you desire. You choose any unused VLAN number yourself, and the port sets how you want the data to be physically sent into or out of the node. How the data is moved to the peer device is not defined in any way, and deliberately so. Maybe you want to connect that port directly to a non-AREDN® PtP radio. Maybe you feed it into a switch then use some other tunneling technology to get it where it needs to go. Maybe it is just a bit of Ethernet cable. It is entirely up to you. Personally, I use tunnels to connect nodes over the Internet, but I use xlinks to connect nodes over Point-to-Point radios which are not running AREDN® firmware.
Configure the AREDN® nodes at both ends
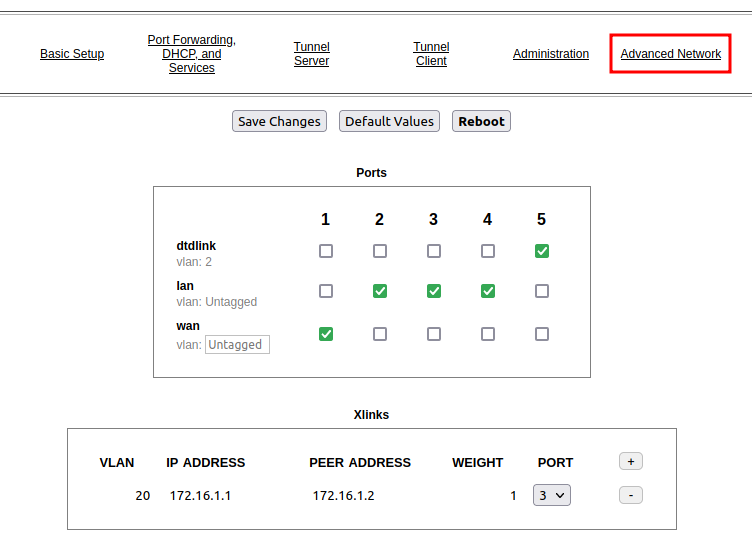
You can use either a Mikrotik hAP ac2 or ac3 as the AREDN® device on each end of the cross-link. Navigate to the Administration > Advanced Network page of the node on one side of the link. To add a cross-link click the plus icon, enter an unused VLAN number for the link, an IP address for the near-side radio, an IP address for the far-side radio, a weighting factor, and the available port to which the near-side radio is connected on your node. The Weight will be used by OLSR to determine the best route for AREDN® traffic.

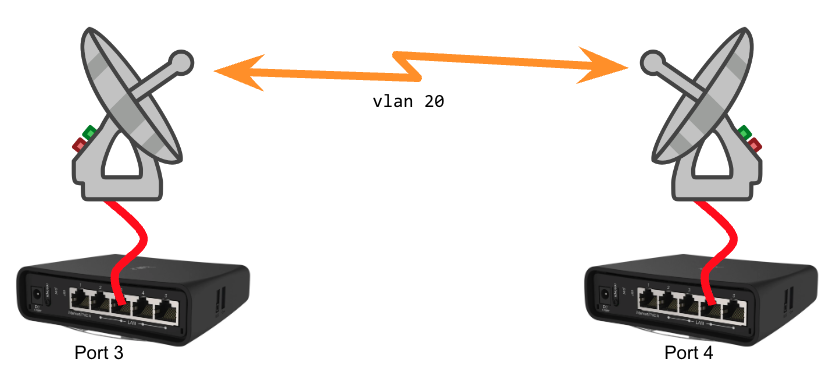
In this example we chose VLAN 20 because it is not in use anywhere else on our network. We assigned an IP Address of 172.16.1.1 for the this node, and we assigned 172.16.1.2 as the Peer Address for the node on the other side of the link. The xlink knows nothing about the details or configuration of the PtP radios, or their IP addresses. The Weight is set to 1 which is the same weight as would be used by a tunnel connection, but this can be increased if you want the cross-link to be chosen at a lower priority for routing traffic on the mesh. Port 3 was chosen because it is an open port on this device. After entering your values, click Save Changes to save the new cross-link information. Now you can cable your near-side PtP device to port 3 on your AREDN® node.

Next, open the Administration > Advanced Network page on the node for the other side of the PtP link. Set the IP Address for this node to 172.16.1.2 and the Peer Address for the node on the other side of the link to 172.16.1.1. The Weight is set to 1 which is the same weight as would be used by a tunnel connection, but this can be increased if you want the cross-link to be chosen at a lower priority for routing traffic on the mesh. In our example we are setting the Port to 4 because it is an open port on this device. After entering your values, click Save Changes to save the cross-link configuration for this side of the PtP link. Now you can cable your far-side PtP device to port 4 on your AREDN® node.
Configure the intermediate Point-to-Point link
How data is moved between the peer devices is not restricted or defined. There are many types of vendor-specific Point-to-Point products that can be used to establish an AREDN® cross-link. Refer to your manufacturer’s documentation for the best way to ensure that network packets can be successfully transferred between the two endpoint devices. The easiest way to accomplish this is to bridge the traffic directly between the peer devices.